Overview
KerioControl 10.0.1 adds built-in support for WireGuard, a VPN protocol built on modern cryptography (Curve25519, ChaCha20). This article covers enabling WireGuard on GFI KerioControl and connecting a client device.
Prerequisites
- GFI KerioControl 10.0.1 or newer.
- A GFI KerioControl user account with VPN access rights.
- GFI KerioControl must be reachable from the internet on UDP port 51820.
- The default VPN Services traffic rule enabled.
Solution
Step 1. Enable the VPN Services traffic rule
Confirm the default VPN Services traffic rule is enabled so WireGuard traffic is permitted through the firewall. In GFI KerioControl 10.0.1, WireGuard is listed among the services of this rule, alongside the other VPN services such as IPsec, Kerio VPN, and OpenVPN.

Step 2. Enable the WireGuard server
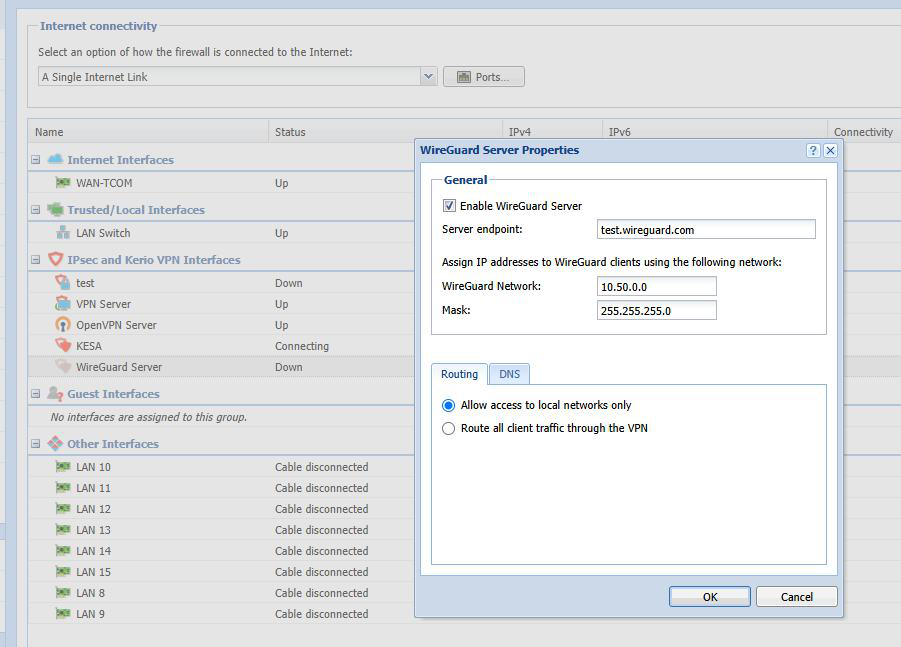
In GFI KerioControl, turn on the WireGuard server and enter the public IP address or hostname that clients will use to reach this GFI KerioControl instance from outside the network.
- In the interfaces list, open WireGuard Server (listed under IPsec and Kerio VPN Interfaces) to display the WireGuard Server Properties dialog.
- In the General section, check Enable WireGuard Server.
- In Server endpoint, enter the public IP address or hostname of GFI KerioControl (for example,
vpn.example.com). - Under Assign IP addresses to WireGuard clients using the following networks, set the WireGuard Network and Mask (for example,
10.50.0.0/255.255.255.0). - On the Routing tab, choose one of the following:
- Allow access to local networks only
- Route all client traffic through the VPN
- Review the DNS tab as needed, then click OK.
Step 3. Generate a client profile
Choose a GFI KerioControl user with VPN access rights. In the GFI KerioControl user interface, go to VPN Profiles and select Download WireGuard profile.
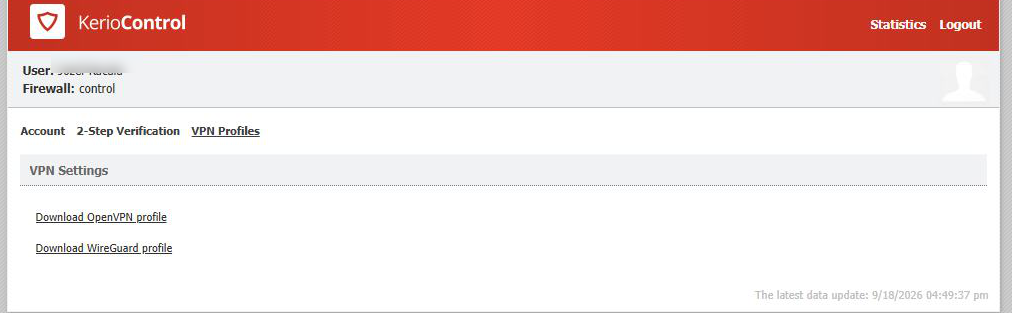
Note: The Download WireGuard profile option is on the same VPN Profiles page as Download OpenVPN profile. For more information about the user interface, see OpenVPN integration in Kerio Control.
Step 4. Name the device
Each WireGuard profile is valid for a single device only. Enter a name for the device that will connect (for example, Marketing-Laptop-1), then click Download to generate the configuration file. GFI KerioControl creates a file named wireguard-<device-name>.conf.
Step 5. Install the WireGuard client
On the connecting device, download and install the official WireGuard client from wireguard.com/install.
Step 6. Import and activate
Open the WireGuard client, import the .conf file downloaded in Step 4, and activate the tunnel. Once active, the device is connected to the network over WireGuard VPN.
Additional notes
- Because each profile is valid for a single device, generate a separate profile (with a unique device name) for every device a user connects with.
- If clients cannot connect, verify that UDP port 51820 is reachable on GFI KerioControl from the internet and that the VPN Services traffic rule is enabled.
Ciprian Nastase
Comments